Familiarity with human proportions is one of the keys to making your drawings look convincing and giving you the confidence to draw figure poses without hesitation.
Today we look at the basic proportions of the human figure and share some of the best approaches to getting them down nicely on paper. There are plenty of anatomy guides available and worth looking at but these are my top-tip highlights of the main basic anatomical information and process that have helped my students and I over the years.
Human Proportions - Checklist
1. Use Basic Shapes as Building Blocks
Practice and experiment to find your own way of breaking down the complex human figure into simple solids like ovals, cones, and bean shapes. This helps in understanding the overall structure of the figure and offers a quick way of getting its proportions down right from the start. See below illustrations for ideas of how you can construct figures in a variety of ways.
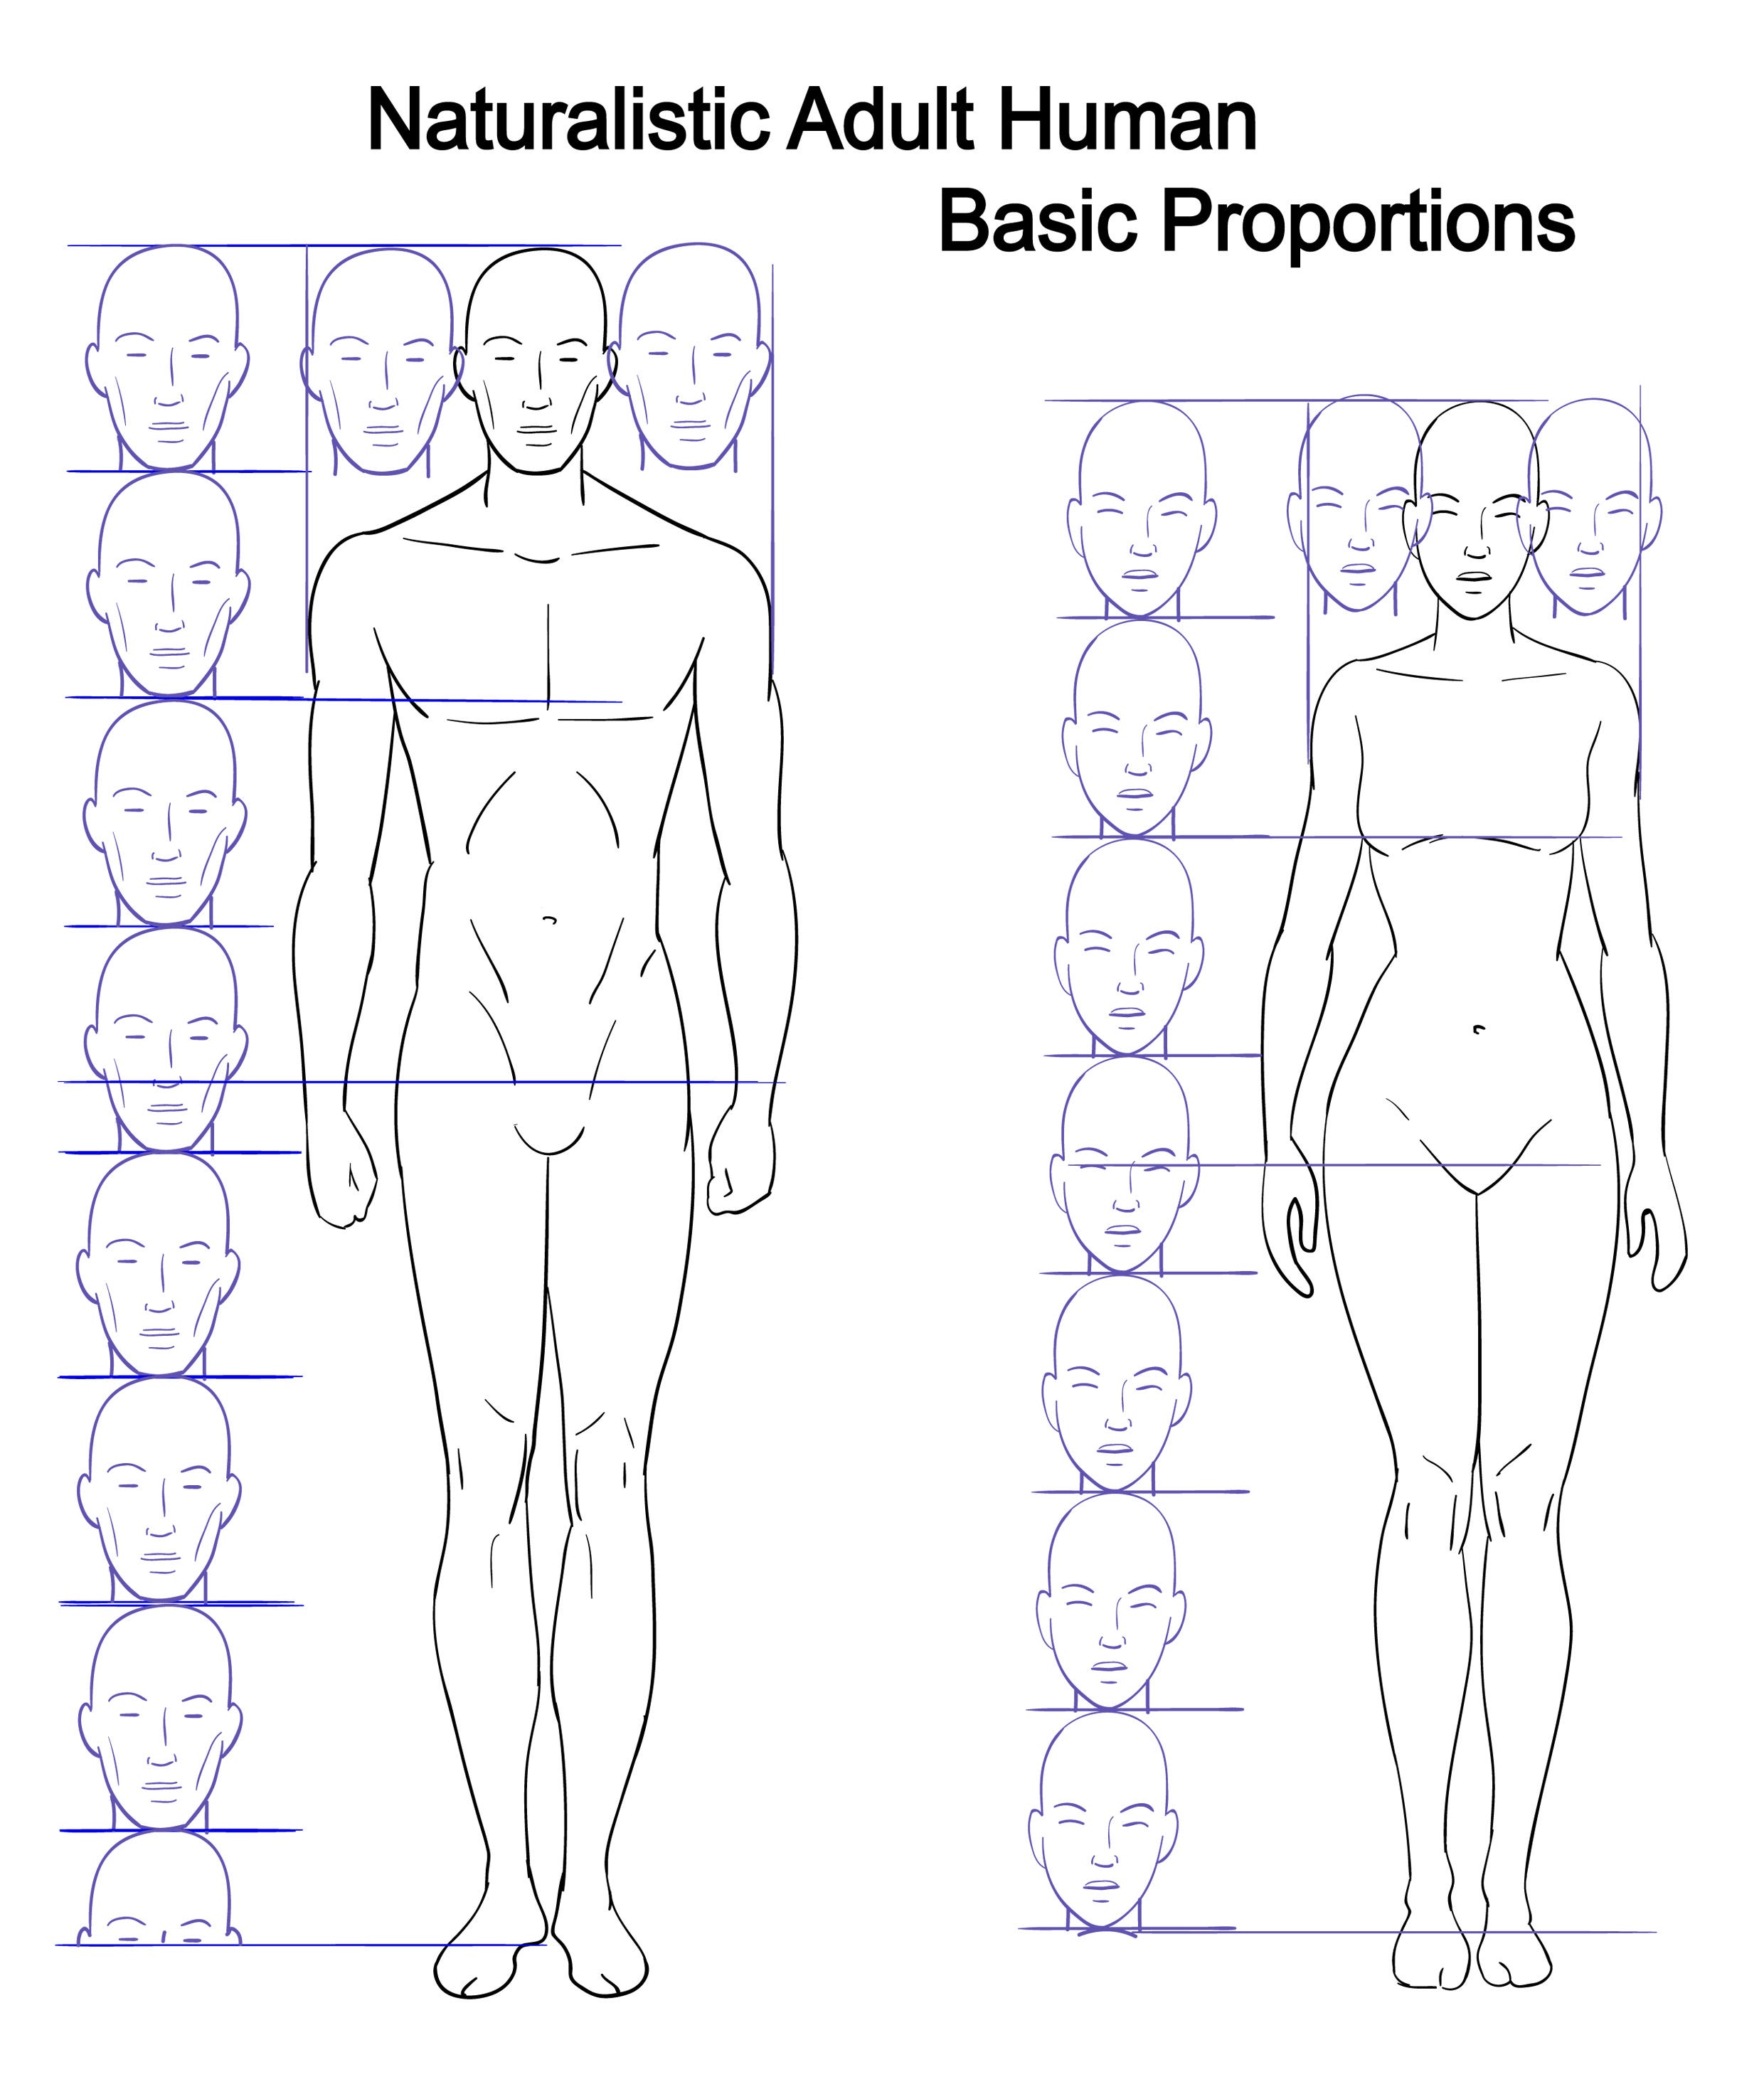
2. Learn the Average Proportions
Familiarize yourself with the main average proportions of the human body, such as the average head being about one-seventh or eighth of the total body height or that the shoulders are about as wide as three heads. The eyes are in the middle of the head vertically and the mid-point of the body is at the groin. These basic proportions serve as a useful cross-check against what you can see in your reference and your drawing.
3. Check and Recheck Measurements
Regularly measure and compare different parts of your drawing to ensure they are in correct proportion to each other. This can be done by eye but feel free to use tools like a ruler or your pencil to gauge distances if it helps you at first.
Look out for foreshortening in the subject – the phenomenon of perspective where, if you are looking ‘down’ say, an arm, it will appear much shorter than if it were viewed side-on – may alter measurements so be mindful of what you can actually see in your subject matter.
4. Use Reference Images
Reference drawing can be broken down and allow you to understand the proportions of one part of your drawing to another part. Many highly realistic artists use some version of the grid method over a reference image to accomplish exact replica drawings. In general,
our coursework emphasizes drawing ‘by eye’ but if this is something that you would like to practice, one tip I can give is to make up three versions to work from: a black-and-white high-contrast version, a low contrast greyscale, and a full-colour reference image.
These different versions will help you to distinguish between shapes, tonal (brightness/greyscale) values and colours.
For figure drawings from reference, I would suggest you do quick sketching at first to create small studies and then select and work from that and your reference to build up to a larger/longer drawing.
Start Loose with Under-drawing - Skipping out on the rough foundation can lead to distorted proportions in the figure and/or a very stiff or mechanical seeming figure. You can always tighten things up later – I have found its best to start with loosely rendering the approximate shapes of the big volumes you see first, possibly with basic shape construction.
To achieve this, try for gestural marks that build up into rough enclosed shapes for the parts of the figure and use these to get proportions roughly correct first before diving into details.
Try to define the whole figure and establish their relation to background/foreground with rough drawing or at least planning marks to avoid getting major size relationships wrong and related problems like fitting the figure or scene on to the page.
2. An Overall Sense of Proportion
Artists can get stuck on the rendering of a single object or part of the figure before working out their entire drawing. It is important to loosely sketch out everything, paying attention to overall proportions and then only dive into detailed work.
The idea is to map out the figure so that you can compare sizes on the drawing, if you don’t have much on the page there is little to compare with. Do pay attention to scale as you are going but don’t expect to get everything down perfectly first time, double-check and edit as you go. Working from big to small, rough to fine is the best way to fix your proportions (and probably to work visually in general).
Let’s Dive into Drawing
1. Sketch using the standard average proportions
The best way to get the hang of the human proportions is to use them – try drawing some full-body standard proportion adult figures at the naturalistic average of 7 or 8 heads – feel free to keep your rough construction in and show us so we can see how you figured out the relationships between body parts.
2. Try sketching with some non-standard proportions
Either from reference or from your imagination try drawing some figures that have different proportions – these can be children, giants or a stylized character of your own design that has different proportions from the averages above. Try starting with basic shapes that have different size heads and bodies and shapes as pictured below.
Visually Speaking
This is Archie’s version of the above exercise – note the exercise does not require you to produce a finished artwork, just sketches.
Happy Drawing! Remember, practice makes perfect. Share your progress with us using @arcb.pictures and stay tuned for news on courses, draw-along sessions, and awesome drawing content!
If you are ready to learn more, sign up for our full 8-week mentorship with Archie Birch. Level up your drawing now. Seats are limited and the mentorship works on a first come first serve basis.
Thanks for reading Arc-B Pictures! Subscribe for free to receive new posts and support my work.